Getting Started with PlatformIO
This guide will help you take the first steps with programming STM32 microcontrollers using the PlatformIO ecosystem. The goal of this guide is to show you how simple it is to set up PlatformIO with Visual Studio Code and use it to compile, upload, and debug STM32Cube-based application on the STM32 Nucleo-F401RE board.
What is PlatformIO?
PlatformIO is a professional collaborative platform for embedded development that includes lots of instruments for the most common development tasks. It has out-of-the-box support for STM32 microcontrollers and allows working with low-level libraries like CMSIS, STM32Cube, and LibOpenCM3 as well as with popular high-level frameworks like Arduino, Mbed, or Zephyr without changing your development environment.
A detailed overview of the PlatformIO ecosystem and its philosophy can be found in the official documentation.
Installation
Some software needs to be installed before diving into the development process. In this guide Visual Studio Code is used as the editor. The most up-to-date and detailed installation instructions can be found in the official PlatformIO IDE for VSCode documentation.
Once the PlatformIO IDE is ready, the ST STM32 development platform can be installed. This way PlatformIO will do all the heavy lifting by installing everything that is needed (toolchain, framework, etc) automatically. The easiest way to install any development platform is the PlatformIO Home App:
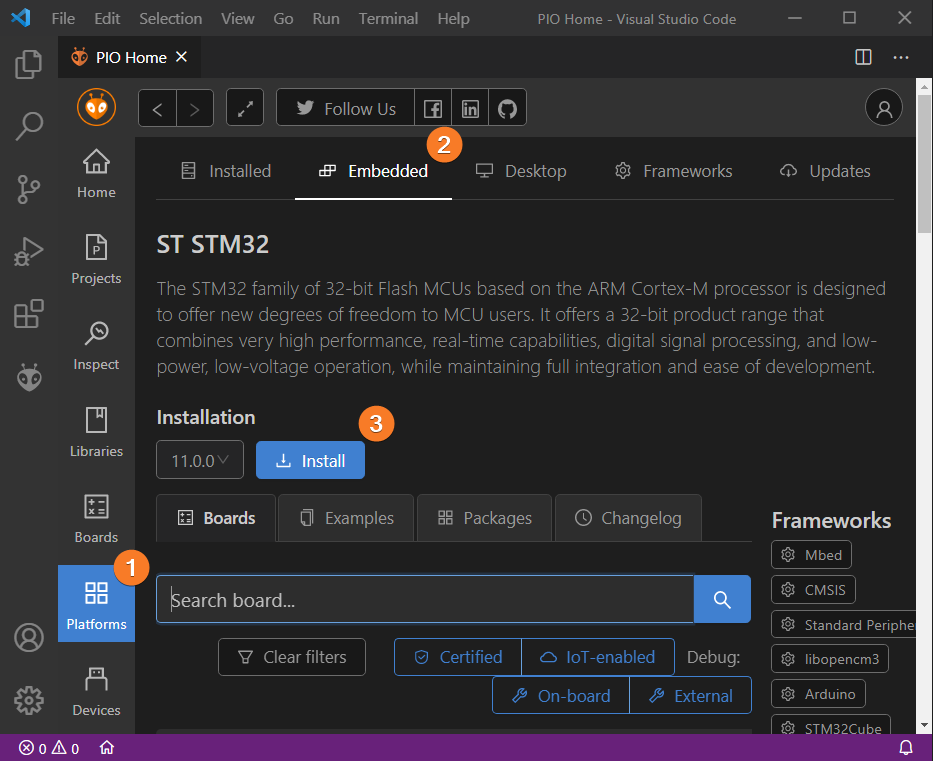
When all installation steps are completed, a dialog window will pop up to tell you that the ststm32 platform has been installed.
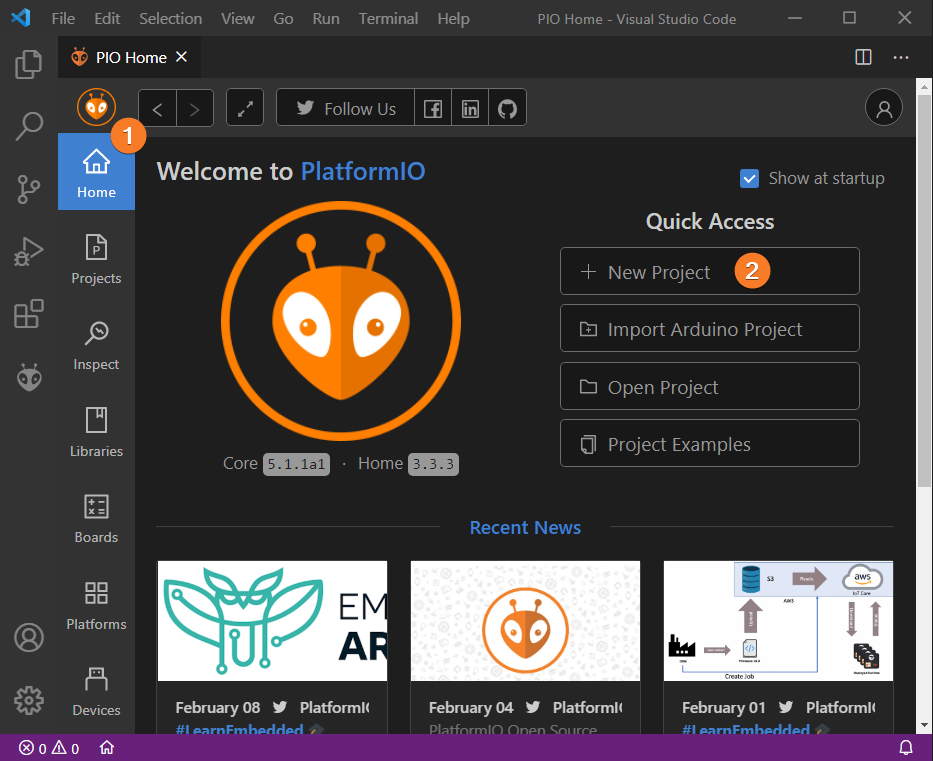
Creating a project
The same PlatformIO Home App is used to create a new project:
In the next step, ST Nucleo-F401RE should be selected as the development board, STM32Cube as the framework, and a path to the project location (or use the default one):
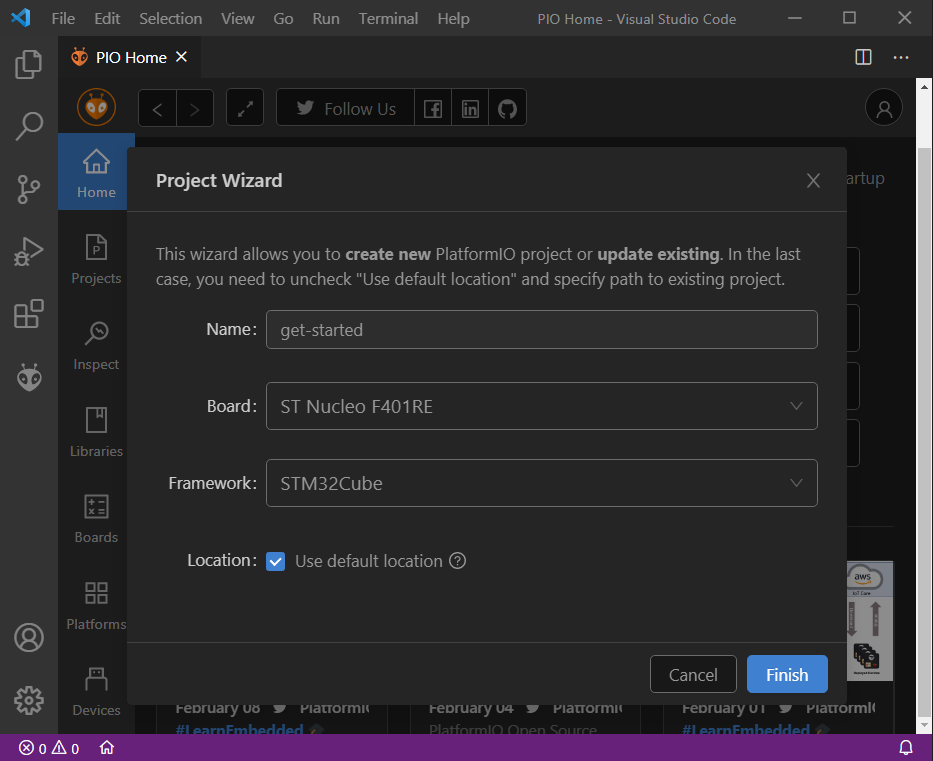
Please note:
Processing the selected project may take a considerable amount of time as PlatformIO will download and install all required packages. After these steps a fully configured project is ready for developing code with the STM32Cube framework.
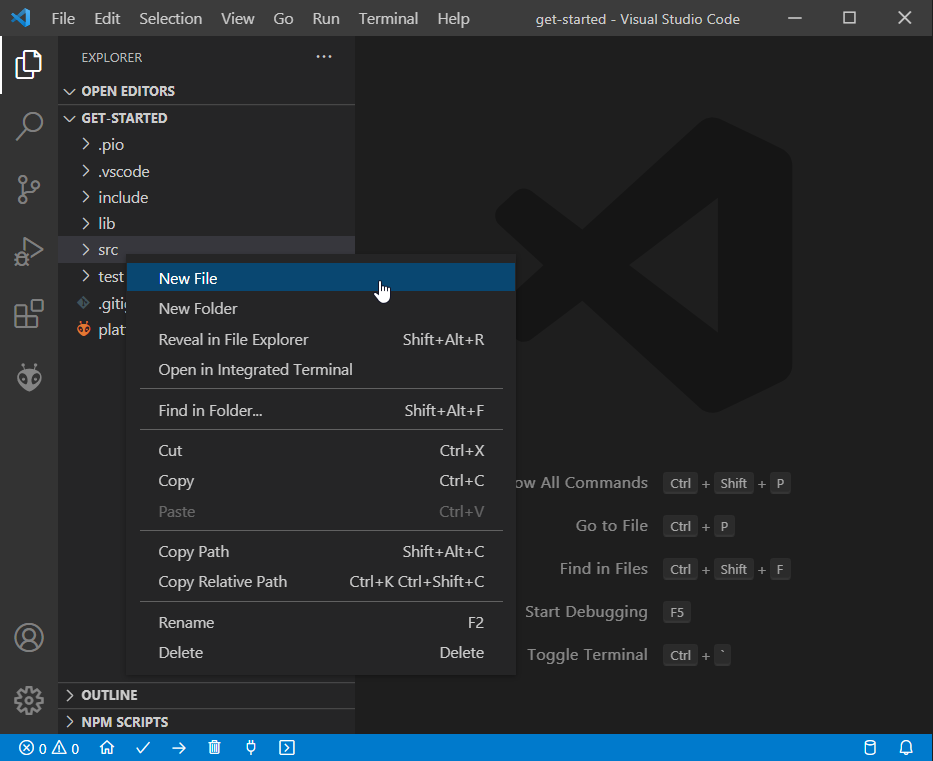
Now some actual code can be added to the project. Firstly, a new file main.c should be created in the src folder. Right click on the src in the project window:
with the following contents:
#include "stm32f4xx_hal.h"

#define LED_PIN                                GPIO_PIN_5
#define LED_GPIO_PORT                          GPIOA
#define LED_GPIO_CLK_ENABLE()                  __HAL_RCC_GPIOA_CLK_ENABLE()

void LED_Init();

int main(void) {
  HAL_Init();
  LED_Init();

  while (1)
  {
    HAL_GPIO_TogglePin(LED_GPIO_PORT, LED_PIN);
    HAL_Delay(1000);
  }
}

void LED_Init() {
  LED_GPIO_CLK_ENABLE();
  GPIO_InitTypeDef GPIO_InitStruct;
  GPIO_InitStruct.Pin = LED_PIN;
  GPIO_InitStruct.Mode = GPIO_MODE_OUTPUT_PP;
  GPIO_InitStruct.Pull = GPIO_PULLUP;
  GPIO_InitStruct.Speed = GPIO_SPEED_HIGH;
  HAL_GPIO_Init(LED_GPIO_PORT, &GPIO_InitStruct);
}

void SysTick_Handler(void) {
  HAL_IncTick();
}
After this step the project is ready for compiling and uploading.
Compiling and Uploading the Firmware
Now the project can be built. The following options are available to compile the final firmware:
- Build option on the
Project Tasksmenu - Build button on PlatformIO Toolbar
- Command Palette
View: Command Palette > PlatformIO: Build - Task Menu
Tasks: Run Task... > PlatformIO: Build cmd-alt-b / ctrl-alt-bhotkeys

If everything went well, the successful result should be printed in the terminal window:

If you see errors, please check your typing carefully and try again.
The following options can be used to upload the firmware to the board:
- Upload option on the
Project Tasksmenu - Upload button on PlatformIO Toolbar
- Command Palette
View: Command Palette > PlatformIO: Upload - Task Menu
Tasks: Run Task... > PlatformIO: Upload cmd-alt-u / ctrl-alt-uhotkeys
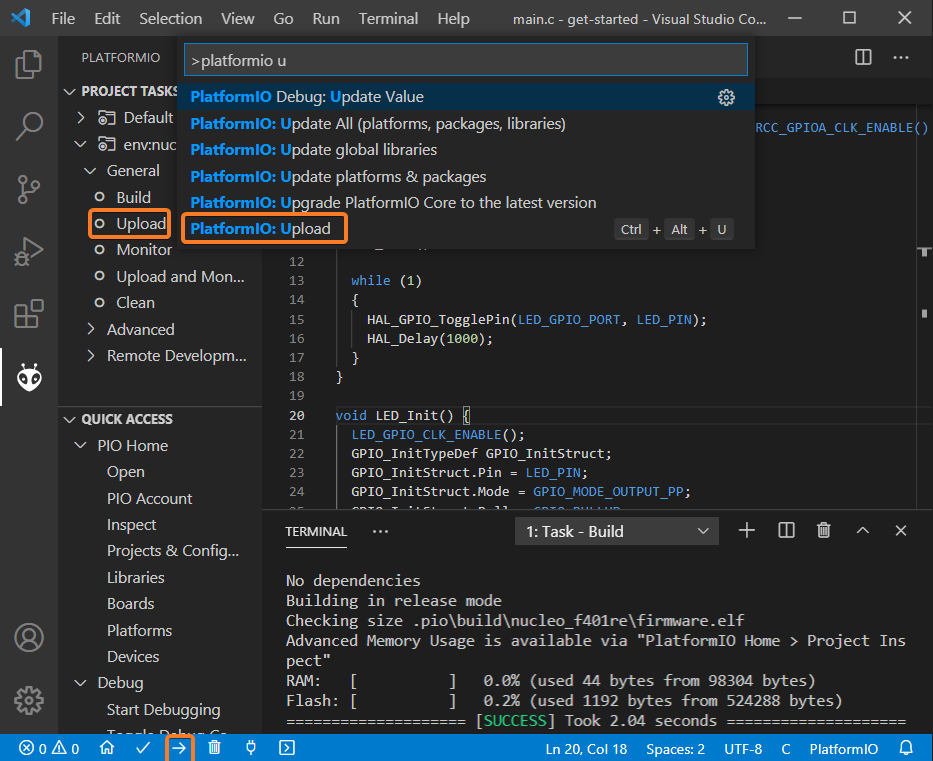
After successful uploading, the green LED2 should start blinking.
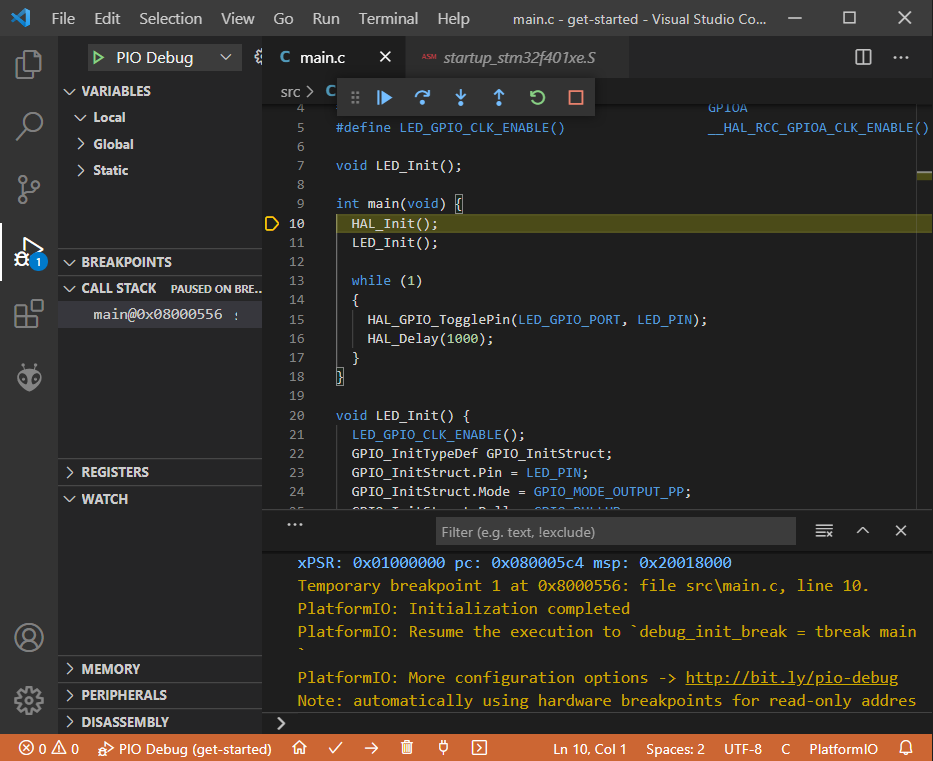
Debugging the Firmware
PlatformIO offers the easiest way to debug your applications. To start a debugging session you can use the Start Debugging option in the PlatformIO Quick Access menu, Debug: Start debugging from the top menu, or the hotkey button F5:

The initialization of a debug session will take some time and when the first line after the main function is highlighted the project is ready for debugging:
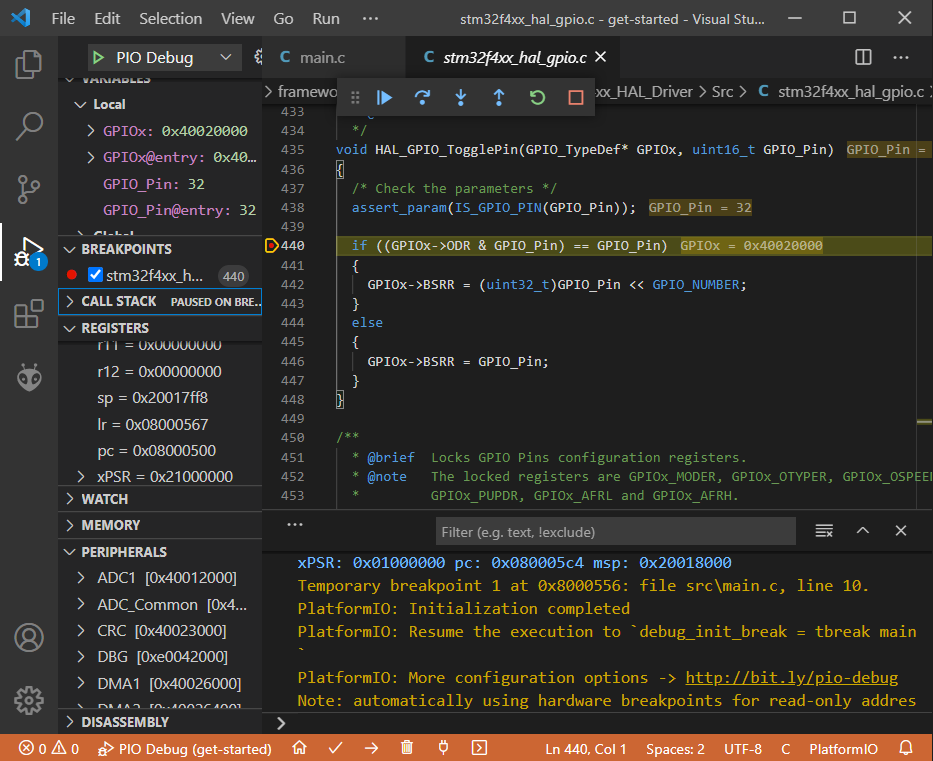
During a debug session it’s possible to step through the code using control buttons, set breakpoints, see peripheral registers, and add variables to the Watch window:
Conclusion
This guide showed how to start developing for STM32 microcontrollers from within Visual Studio Code and the PlatformIO ecosystem. The project created throughout this guide can be used as a boilerplate for the next projects based on the STM32 Nucleo-F401RE board.
Next steps
Here are some useful links for exploring the PlatformIO ecosystem:
- Try other frameworks that can be used with the STM32 microcontrollers
- Learn more about integrations with other IDEs/Text Editors
- Check out additional tutorials and examples
- Get help from the PlatformIO community